Tuesday, September 30, 2014

How to make an Awesome Pirate Lamp


Pirate Lamp

Want to add a little light to your house, study table or just want to have a little light in Halloween. Here is a cool pirate lamp that I made using some old furniture and few LED's. It is super bright and can light up a small room. This is the first time I worked with wood. You can choose your add your own designs and make it more personal.

Difficulty level : Medium

Things you will need :

1. Printed circuit board (PCB)
2. Super bright LED's
3. LED heat sink
4. Plywood
5. Some wires
6. Sand paper
7. Skull print cloth
8. Some Nails

#Steps :

Step 1 : Cut a rectangular Plywood of the desired size and drill holes at the specified places as shown in the picture.


Step 2 : Cut a small size of PCB and solder a socket for input supply of 5 volts.


Step 3 : Cut three wood pieces of appropriate sizes and join them together as shown.


Step 4 : Attach this to the piece of plywood as shown. Make sure its right at the centre of the ply.


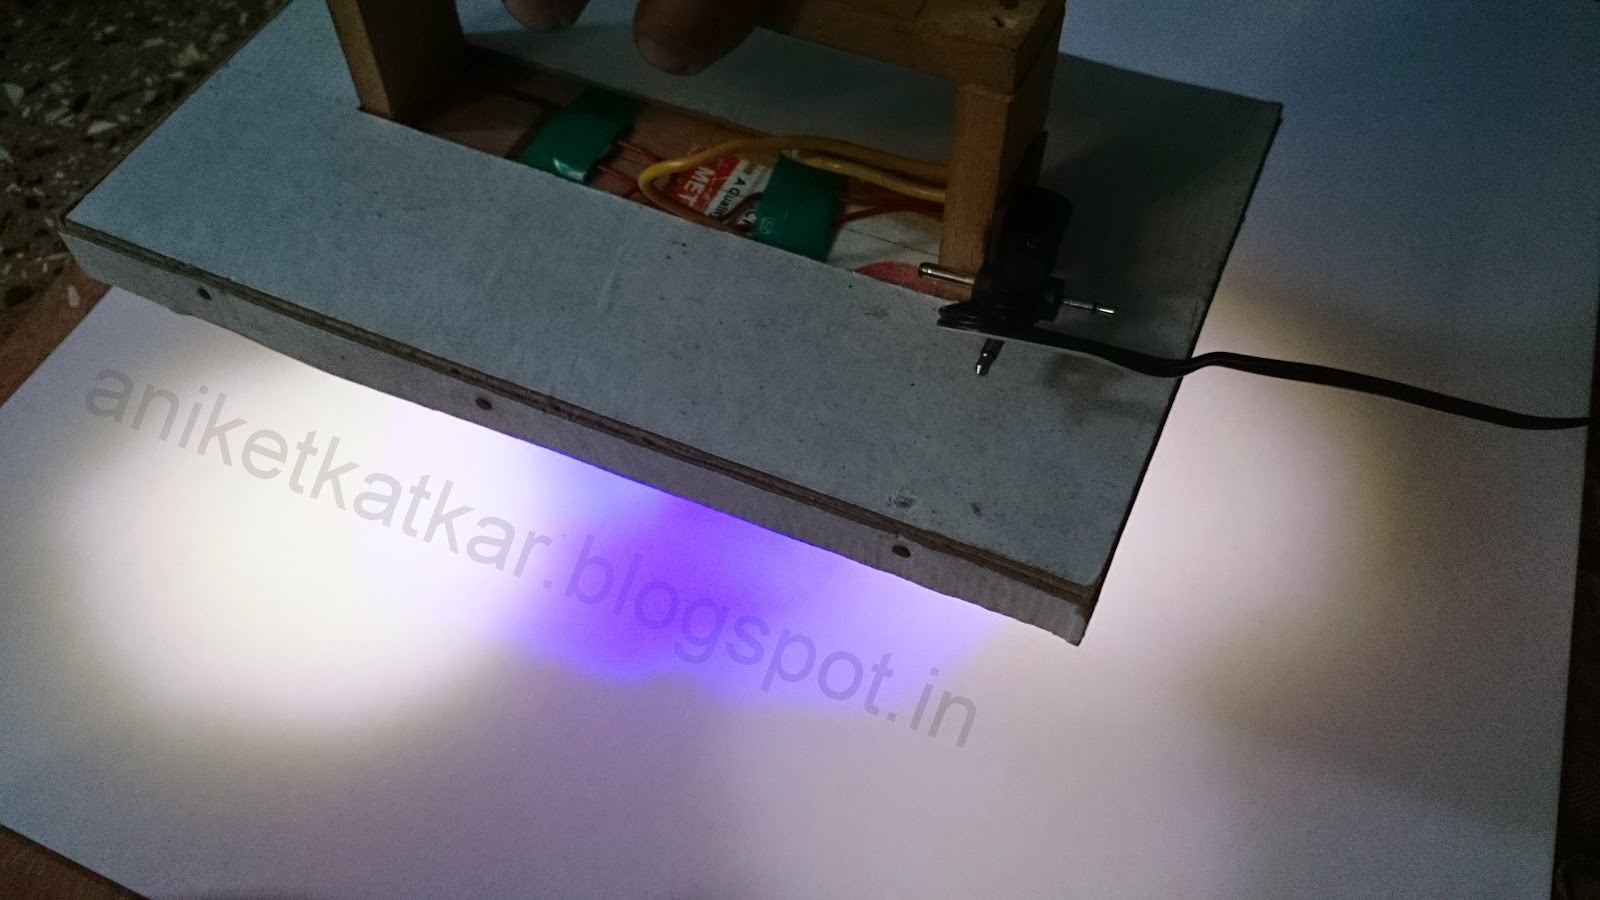
Step 5 : Solder all the 6 LEDs in parallel at appropriate lengths so that they reach the holes. Check if all are working properly. Place them in the holes light side down.


Step 6 : Tape the LEDs in the holes firmly and make sure they don`t move. Switch on the circuit and check if the light is falling perfectly.


Step 7 : Cover the wires on the upper side using a white card paper cut in appropriate size.


Step 8 : Pull out the connection wires out from the side. Solder the power socket made in Step 2 to the wires. Make sure the wires are firm enough and connected in the right polarity. Attach it to the side using paste or screws.


Step 9 : Plug in the power cord and check if its working.


Glow in the dark

Step 10 : Cover the card paper with a clean white paper. Draw an awesome design on the upper side of your choice. A tribal design is shown in the picture.

Tribal Design I

Tribal Design II

Final
Step 11 : Finally attach a black pirate cloth or paper as shown to cover the open part. You can attach any print of your choice. If you want to make it more attractive, place a small bulb behind the skull :P

Final Lamp
Personalize the Lamp as you want with your own color, designs and Skull. Attach it to your study table or above any decorative object. Best one is use it in Halloween ;)


Please SHARE if you like it. Comment if you have any doubts or suggestions to help improve :)

Please like us on Facebook at www.facebook.com/ArtronicsBlog

Thursday, August 28, 2014

How to make a LED blinky Guitar Keychain

 Guitar Key chain

Make a cool guitar key-chain which blinks when plugged to a USB or OTG (On The Go) supported phone. I have used a White LED here but you can personalize it with any color.

Difficulty level : Easy

Things you will need :

1. Printed Circuit Board (PCB)
2. 1k Ohm resistor X 2
3. LED (Any color)
4. Hot glue gun
5. Acrylic colors
6. IC 555
7. 22uF electrolytic capacitor
8. Small piece of wires
9. Sand paper

Circuit Diagram : 


#Steps :

Step 1: Cut a guitar using card paper of your desired shape and size. Use this as a stencil to draw on the PCB.


Step 2 : Draw the guitars on a PCB (Make sure there is enough space for the circuit to fit in).


Step 3 : Cut the guitar shape using a hack-saw. Polish the copper side of the PCB with a sand paper till it becomes shiny.


Step 4 : Draw the circuit on the shiny side as shown in the diagram using a permanent marker.


Step 5 : Etch the PCB till all the copper fades out. Rinse the guitar with water. Remove the marker ink with acetone or nail polish remover.


Step 6 : Drill holes for the components.


Step 7 : Place the components in their respective places and solder them.


Step 8 : Paint the solder side with Texture white and leave to dry.


Step 9 : Scratch the surface a little so that the hot glue adheres properly and then cover the whole component side with hot glue. Make sure it is smooth and looks glossy.


Step 10 : Paint the guitar with Acrylic colors of your choice and let it dry.

Final Product
Just plug it in USB port and watch it GLOW!! Attach a chain to tie your keys.

Connected to USB port.


Connected via OTG.

Connected via OTG.

Please SHARE if you like it. Comment if you have any doubts. :)

Please like us on Facebook at www.facebook.com/ArtronicsBlog

Thursday, July 24, 2014

How to make a Seven Segment Display keychain

SSD Key chain

Here's how to make a personalized key-chain using Seven Segment Display. Use it to highlight your Initial or simply use it as a fancy key-chain. It lights up brightly and can be used to search the keyhole in the dark.

Difficulty level : Easy

Things you will need :
1. Seven Segment Display (SSD) Common cathode (CA)
2. 3 volt button cell
3. General purpose PCB
4. 3 volt button cell holder
5. Key-chain
6. Some wire

Pin Diagram : 


Circuit Diagram (For displaying 'S') :


#Steps:

Step 1. Take a general purpose PCB.


Step 2. Cut it appropriately such that the Seven Segment Display(SSD) fits on it.


Step 3. Solder the seven segment display on the general purpose PCB. Care should be taken that the open pins should not get shorted while soldering.


Step 4. Make connections for displaying the alphabet of your choice as given in the pin diagram.


Step 5. Take a 3V battery holder and solder it directly on the PCB with proper polarity.


Step 6.Connect a battery in the holder and check if the the SSD displays the required alphabet.


Step 7. Make a small loop using a wire and solder it on the top to make a holder for the chain.


Step 8. Attach a key-chain and you are almost done! You can color the key-chain as per your choice. Make different alphabets using the chart provided above. 


Note:
-Only the alphabets A, B, C, E, F, H, I, J, L, O, P, S, U, Y and Z can be made using a Seven Segment Display. Other alphabets cannot be displayed.
-Refer the pin diagram of Seven Segment Display to display various alphabets mentioned above.

Comment if you have doubts. Please Share if you like this post :)

LIKE us on Facebook www.facebook.com/ArtronicsBlog