Showing posts with label showpiece. Show all posts

Monday, November 23, 2015

How to make a Simple Lamp

Simple Lamp
This article explains how to make a Simple Lamp using recyclable materials like a plastic bottle and some electronics. You can use this simple article as a showpiece in festivals like Diwali, Christmas, etc.

Difficulty level : Very Easy

Things you will need :
  1. A used plastic bottle
  2. Small Lamp (3~6V)
  3. Cardboard box
  4. 5V battery
  5. Switch
  6. Insulated wire
#Steps:

Step 1 : Take a small cardboard box or make one of appropriate color and size as shown in my previous blog.

Step 2 : Make a small circuit as shown below. Use a simple button switch and connect it in series with the Lamp and a Battery. Fit this assembly in the cardboard box. Use a Lamp holder shown below to fix the lamp firmly in it.
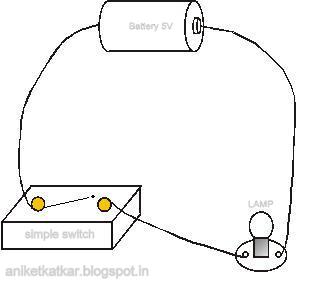
Circuit Diagram

Step 3 : Various types of screw lamps are available on google and local electronics stores for cheap. I hacked it from a old toy projector I had.

Lamp Holder


Step 4 : Make a hole on the top side of the cardboard box and take out the lamp holder assembly through it. Attach the cap of the bottle we are going to use to the base of the holder as shown. It will be used to secure the bottle arrangement firmly.


Step 5 : Make a small rectangular window on the side of the box for the switch as shown. Connect the switch to the circuit internally.


Step 6 : Take a plastic bottle (I used a Mountain Dew bottle as it looks captivating). Cut the bottle in half. Use some part of it to make a small flower as shown.


Step 7 : Take the upper part of the bottle and cut it in this shape or any shape of your choice.


Step 8 : Place the two pieces together as shown and glue them together.


Step 9 : Attach the whole flower assembly to the bottles cap which we previously fixed in step 4.


And Let there be Light!!


Make various Shapes and Sizes using different colors!

Please SHARE if you like it.
Comment if you have any doubts or suggestions to help improve :)

Please like us on Facebook at www.facebook.com/ArtronicsBlog

Wednesday, July 1, 2015

How to make a 3D Art Piece

3D Art Piece

Want some cool showpiece for the empty space on your table? Or just some nice decorations for an occasion? Here's how you can make a 3D Art Piece using Hot glue and a LED. Using Hot glue is simpler and economical than using a 3D printer for such shapes.
You can view the How to video tutorial here 

Difficulty level : Easy

Things you will need :
  1. Hot glue gun
  2. 3V LED
  3. 3V Coin cell
  4. 3V Coin cell holder
  5. A small cardboard box
  6. Some plastic sheets
  7. LED heatsink
#Steps : 

Step 1 : Take a small box as shown and cut the flaps off both sides. The box should look as shown after cutting the flaps.


 Step 2 : Open the box from the edge as shown. Then wrap a piece of plastic around it, and make the box again. The plastic wrap prevents the hot glue from sticking to the box.


Step 3 : Take an LED and place it on a heatsink and solder its terminals to the heatsink.


Step 4 : Now glue the heatsink to a 3V coin cell holder's back and solder the terminals to the holder's terminals. Make sure you keep the right polarity while soldering.


Step 5 : Place the LED on a plastic sheet and place the box on it as shown. Make sure the LED is in the center of the box.


Step 6 : Hold the box with your hand and pour Hot glue in the box enclosure using a Hot glue gun. Pour as much as half the box.


 Step 7 : Let the whole assembly dry.


Step 8 : Remove the setup and start removing the box slowly. You will get a nice finish and make sure you dont damage the strand like structures because they look really cool.


Step 9 : Place a 3V Coin cell in the holder and let the magic work for itself.


With Flash
No Flash
In Dark room
In Dark room: HDR mode

 You can experiment with various boxes and different shapes and sizes. Also you can sprinkle some glitter whilst pouring the hot glue for extra aesthetics. Have fun. Share your views or ideas in the comments.

You can view the How to video tutorial here

Please SHARE if you like and feel free to comment/ask what you made :)

Like us on Facebook at www.facebook.com/ArtronicsBlog