Thursday, January 1, 2015

How to make a Name Tag


Name Tag

Here's how to make a cool Name Tag using Seven segment displays (SSD). Earlier, we had made a key chain using a SSD which you can view here. A similar method is used to connect the SSD's in parallel to a cell and use them to make a short Name Tag. I have used red SSD's but different colors are available in market and you can select one of your choices.

Difficulty level : Easy

Things you will need :
1. Printed Circuit Board (PCB)
2. Seven Segment Displays(SSD) x 3
2. 3v Cell
3. 3v Cell holder
4. A switch
5. Soldering equipment
6. M seal/Hot glue


Pin Diagram :


#Steps :

Step 1 : Cut a general purpose PCB of appropriate size.


Step 2 : Insert a SSD in the PCB. Make sure you don't damage the pins while doing so.


Step 3 : Insert the second and third SSD neatly besides each other. Again make sure the pins don't bend.


Step 4 : Solder all the SSD's as shown. Do not over heat the SSD's while soldering to avoid damage. Only solder the pins which you want to use.


Step 5 : Take a 3volt Battery holder and place it firmly in the PCB and solder it.


Step 6 : Add a switch in series with the cell and SSD's and solder it.


Step 7 : Place the battery in the holder and Check if its working. I wanted to display 'SHA' which is one of my friends name and seems like its working perfectly :P


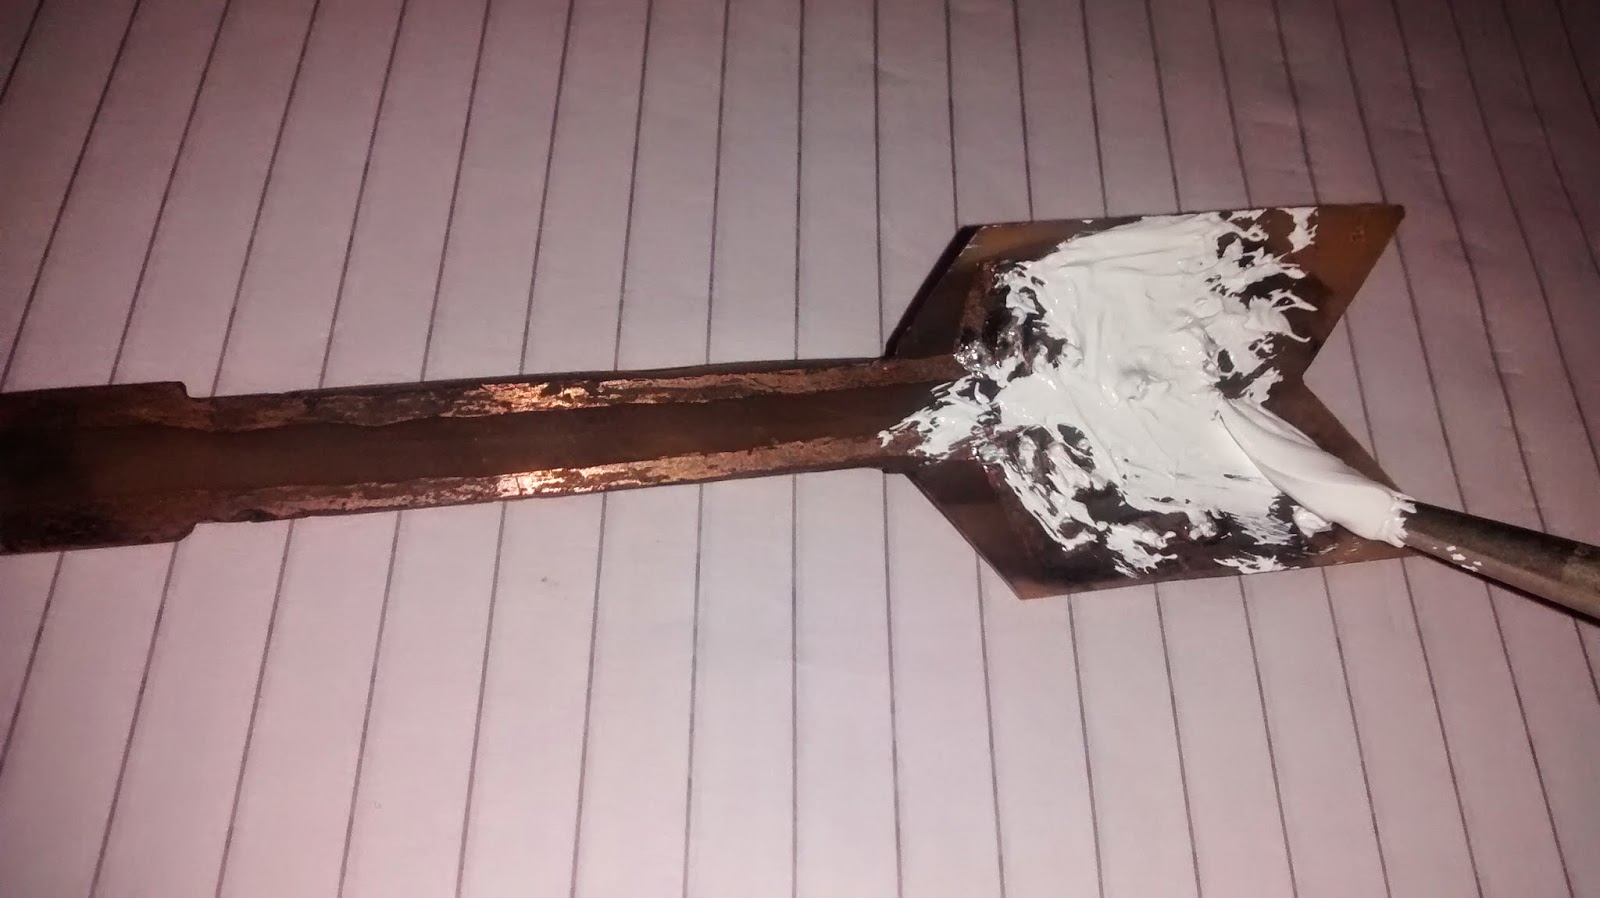
Step 8 : Get Mseal or Hot glue and mix some amount to get the paste and cover the whole area as shown.


Step 9 : Paint as per your favorite color and set to dry. Here i have used black acrylic. Color as per your choice.


Thats it! Done! :) Make any names depending on the letters used. Use it on the showcase or as a nameplate on your door.

"Wishing you all a Happy New Year"

Please SHARE if you like it. Comment if you have any doubts or suggestions to help improve :)

Please like us on Facebook at www.facebook.com/ArtronicsBlog


Tuesday, September 30, 2014

How to make an Awesome Pirate Lamp


Pirate Lamp

Want to add a little light to your house, study table or just want to have a little light in Halloween. Here is a cool pirate lamp that I made using some old furniture and few LED's. It is super bright and can light up a small room. This is the first time I worked with wood. You can choose your add your own designs and make it more personal.

Difficulty level : Medium

Things you will need :

1. Printed circuit board (PCB)
2. Super bright LED's
3. LED heat sink
4. Plywood
5. Some wires
6. Sand paper
7. Skull print cloth
8. Some Nails

#Steps :

Step 1 : Cut a rectangular Plywood of the desired size and drill holes at the specified places as shown in the picture.


Step 2 : Cut a small size of PCB and solder a socket for input supply of 5 volts.


Step 3 : Cut three wood pieces of appropriate sizes and join them together as shown.


Step 4 : Attach this to the piece of plywood as shown. Make sure its right at the centre of the ply.


Step 5 : Solder all the 6 LEDs in parallel at appropriate lengths so that they reach the holes. Check if all are working properly. Place them in the holes light side down.


Step 6 : Tape the LEDs in the holes firmly and make sure they don`t move. Switch on the circuit and check if the light is falling perfectly.


Step 7 : Cover the wires on the upper side using a white card paper cut in appropriate size.


Step 8 : Pull out the connection wires out from the side. Solder the power socket made in Step 2 to the wires. Make sure the wires are firm enough and connected in the right polarity. Attach it to the side using paste or screws.


Step 9 : Plug in the power cord and check if its working.


Glow in the dark

Step 10 : Cover the card paper with a clean white paper. Draw an awesome design on the upper side of your choice. A tribal design is shown in the picture.

Tribal Design I

Tribal Design II

Final
Step 11 : Finally attach a black pirate cloth or paper as shown to cover the open part. You can attach any print of your choice. If you want to make it more attractive, place a small bulb behind the skull :P

Final Lamp
Personalize the Lamp as you want with your own color, designs and Skull. Attach it to your study table or above any decorative object. Best one is use it in Halloween ;)


Please SHARE if you like it. Comment if you have any doubts or suggestions to help improve :)

Please like us on Facebook at www.facebook.com/ArtronicsBlog

Thursday, August 28, 2014

How to make a LED blinky Guitar Keychain

 Guitar Key chain

Make a cool guitar key-chain which blinks when plugged to a USB or OTG (On The Go) supported phone. I have used a White LED here but you can personalize it with any color.

Difficulty level : Easy

Things you will need :

1. Printed Circuit Board (PCB)
2. 1k Ohm resistor X 2
3. LED (Any color)
4. Hot glue gun
5. Acrylic colors
6. IC 555
7. 22uF electrolytic capacitor
8. Small piece of wires
9. Sand paper

Circuit Diagram : 


#Steps :

Step 1: Cut a guitar using card paper of your desired shape and size. Use this as a stencil to draw on the PCB.


Step 2 : Draw the guitars on a PCB (Make sure there is enough space for the circuit to fit in).


Step 3 : Cut the guitar shape using a hack-saw. Polish the copper side of the PCB with a sand paper till it becomes shiny.


Step 4 : Draw the circuit on the shiny side as shown in the diagram using a permanent marker.


Step 5 : Etch the PCB till all the copper fades out. Rinse the guitar with water. Remove the marker ink with acetone or nail polish remover.


Step 6 : Drill holes for the components.


Step 7 : Place the components in their respective places and solder them.


Step 8 : Paint the solder side with Texture white and leave to dry.


Step 9 : Scratch the surface a little so that the hot glue adheres properly and then cover the whole component side with hot glue. Make sure it is smooth and looks glossy.


Step 10 : Paint the guitar with Acrylic colors of your choice and let it dry.

Final Product
Just plug it in USB port and watch it GLOW!! Attach a chain to tie your keys.

Connected to USB port.


Connected via OTG.

Connected via OTG.

Please SHARE if you like it. Comment if you have any doubts. :)

Please like us on Facebook at www.facebook.com/ArtronicsBlog